How to Send PDF's in MailerLite
One of the best ways to build your email list is by offering freebies. A freebie is something you give away to a potential subscriber in exchange for their email address. The most common form of a freebie is a PDF. They're easy to send and anyone can open and save them.
When I switched from ConvertKit to MailerLite I ran into a bit of a snag when I was setting up my automations and forms. I couldn't attach a PDF! I did some digging and found out a super simple way to get the job done.
So, let's say your latest freebie is a 5 day challenge that's dripped in once a day for 5 days. What you'll do first is create your form:
Click on forms.
Choose which type of form you would like to create. For most of my freebies, as you can see, I use embedded forms.
Click on CREATE EMBEDDED FORM
Name your form. I like to name it the same as my freebie title.
Choose your form type. You can choose from a button or an actual form. We are going to choose the form for this example.
Click CREATE EMBED FORM
Now you need to select your subscriber group. You may not have anything under here, which is totally fine because you can create a new one under this tab. If you need to do that, then just claim ADD NEW GROUP. I like to call my group the same thing as the freebie as well.
Scroll to the bottom and hit SAVE AND CONTINUE.
We will start from the bottom and work down. You can choose to turn your double opt-in on or off. I'm going to turn it off for this one.
Change the copy in the title, text, and button title. You will see the form on the left will auto-populate your changes.
You can leave the text or edit it in the thank you message box or you can redirect the url. I have a separate thank you page on my site that I like to take subscribers to, so I change it to that. Here's an example.
Change the look of your text box as you fit. I like to center mine and bold the lettering.
Click on DESIGN. This is where you change the colors to match your branding, center the title, and change the form layout.
Click on FIELDS if you would like more information from a subscriber besides their email address.
Click on GROUPS to double-check you have the right group selected. As your groups grow you can click on more than one. For example, I may want to click on one of my course funnels as well.
Hit SAVE once you're done.
You are automatically brought to your coding. This is where you grab the java script and/or link to embed your form.
Now that you have your form created, we can go ahead and set up the automation portion.
Click on AUTOMATION
Click on CREATE A NEW WORKFLOW
Name your workflow. I use the title of whatever I'm promoting
Choose your trigger. I'm going to pick "When a subscriber joins a group."
Choose your group. Use the same group you used when creating your form.
Hit SAVE
The purpose of choosing a group is you are telling MailerLite "when a subscriber signs up under the 5 day challenge form I then want this email to go out to them automatically."
Now you're brought to your flow screen. This is one of my favorite parts about MailerLite. I'm a visual person and I love to see all the emails literally right in front of me on a piece of paper. This is so helpful when you're creating a drip course or a series of emails for your marketing funnels.
For this challenge, our plan is to send one email each day for five days. We want the first email to go out immediately after they fill out the form. So, we will go ahead set up our flow:
Click on the + sign

2. Since you want an email to go out immediately, you're going to choose EMAIL.
Now, you'll look over to the right hand side and fill in all your information. The subject line, your name and email, if you want Google Analytics (I always check this box, and your language.
3. Click DESIGN EMAIL.
You have a few choices here. You can use the drag and drop editor (if you're familiar with MailChimp then this is almost exactly the same), rich text editor (what I use 99% of the time, or your own HTML. I'm going to choose rich text editor for this example.
4. Now you can write your email.
This is where we are used to attaching our PDF's. MailerLite is a bit different and since you're reading this blog post this is the moment you've been waiting for!
We are not allowed to attach a PDF in MailerLite. BUT, we can link to one. So, what you're going to do is go into your Google Drive (sign up for one if you don't have one yet) and then drag your PDF into the drive.
5. Click on the share button up on the top right hand corner.
6. Click on the drop down box and pick ANYONE-PUBLIC ON THE WEB
7. Copy the link
8. Click DONE
9. Now go back into MailerLite and hyperlink (link on the chain link) your copy with the link you just copied.
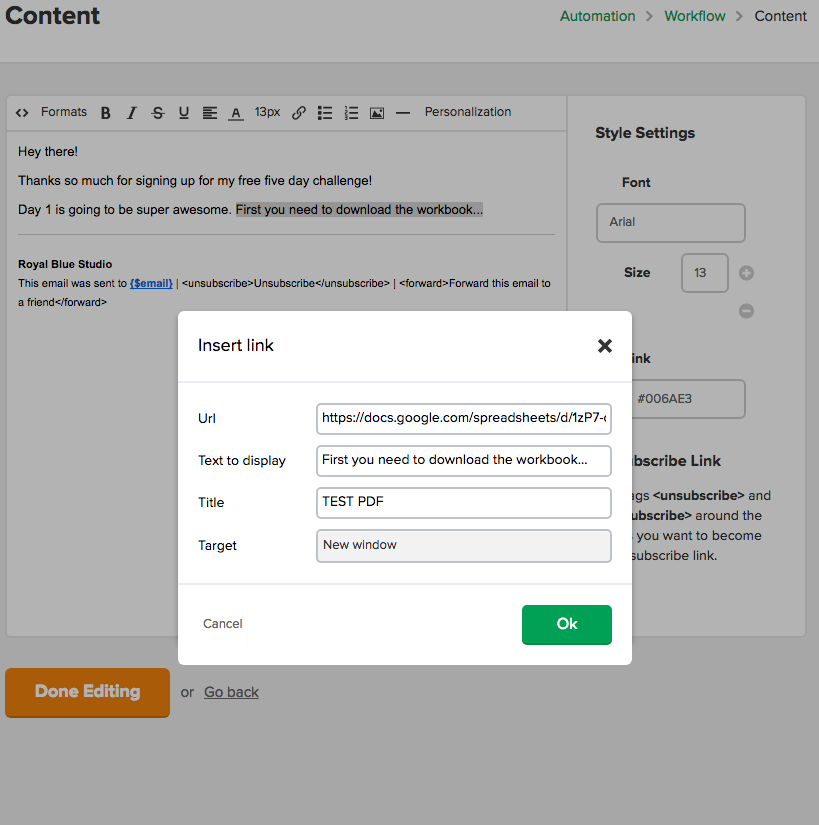
10. Click OK.
11. Finish up your email. Make any changes needed.
12. Click DONE EDITING.
13. Your next step (well the next 4 emails will be the same) is to click the + sign again.
14. This time you'll click on delay, because we want these emails spaced out a day for each one.
15. One the right hand side you'll see this is where you can choose your timeframe. Hit SAVE when you're done.
16. Go back to your flow chart and click the + sign and then EMAIL.
You're going to do the exact same thing for any and all emails going forward.
Super simple right!?
Make sure when you are all done setting up your automation that you turn it on! TOP RIGHT HAND CORNER.
There you have it! Email automation made easy!
PS: If you you're loving the way this looks and want to set up your own account in MailerLite for free then click here to get started!